

In the early days of the World Wide Web, HTML designers were always on the lookout for ways to make their pages as graphically and feature rich as possible. This was no small task. XHTML, CSS, JavaScript and Flash were nowhere to be seen and companies were pressed to make their presence on the Web memorable and unique as everyone rushed into this new frontier.
One of the Web designer’s most trusted tools to this end was the Image Map. Basically an elaborate variation of the <a> tag, an image map allowed an image file to contain multiple hotspots that linked to any number of Web pages or external sites. Many early Web sites relied on an image map on the home page to uniquely identify themselves.
But thanks to the rise of Flash technology, image maps are rarely used anymore. However, CSS does allow you to create an image map with some subtle mouse over effects with a few slick modifications to the <ul> and <li> tags.
For this exercise, we’re going to use the image shown in Figure A to create an image map with two hotspots using CSS code. Save the file to your hard drive and then open it in an image editor that will allow you to measure the image in pixels.
Figure A
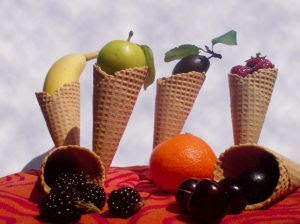
This image will be used to create a CSS image map
Now that you have the image saved to your hard drive and open in an image editor, let’s start coding the HTML and CSS code that will make the image map. In a text or HTML editor, enter the code in Listing A, then save your file with an .htm extension.
Listing A
<html>
<head>
<title>CSS Image Map</title>
</head>
<body>
<div id="photo"> <ul>
<li class="apple"><a href="http://www.bestapples.com" title="Washington Apples">Washington Apples</a></li>
<li class="orange"><a href="http://www.floridaorange.com" title="Florida Oranges">Florida Oranges</a></li>
</ul>
</div>
</body>
</html>
You can see that by the content of the body of the HTML code that we will be using CSS to style a bullet list (i.e., <ul> and <li> tags) in order to make the hotspots for our image map. In fact, if you were to preview the document in a browser right now, all you would see is a bullet list.
Let’s start writing the CSS code and creating a style ID called “photo.” Begin by entering the code into the <head> of the document that you see in Listing B.
Listing B
<html>
<head>
<title>CSS Image Map</title>
<style type="text/css">
#photo {
width: 300px;
height: 224px;
position: relative;
background-image: url(images/fruity_cones.jpg);
background-repeat: no-repeat;
}
</style>
</head>
<body>
<div id="photo"> <ul>
<li class="apple"><a href="http://www.bestapples.com" title="Washington Apples">Washington Apples</a></li>
<li class="orange"><a href="http://www.floridaorange.com" title="Florida Oranges">Florida Oranges</a></li>
</ul>
</div>
</body>
</html>
Note in line five of the code that the CSS style is denoted with a hash mark, or pound sign (#), at the beginning of the photo style. This tells the browser that the style is an ID type and not a Class type, which is denoted with a period (.). CSS IDs are preferable to Classes in many cases, because if an HTML element is wrapped with <div> tag that is defined as an ID, rather than as a Class, we can define how other HTML tags within that <div id> will be displayed and no further markup to the HTML within that <div id> tag will be needed.
You can also see in line nine of the code that we are using the downloaded image from Figure A as a background image. This is because both Internet Explorer 6 and 7 have issues displaying the <ul> and <li> elements over an image that is placed with an <img> tag. Be sure that the path to the image fruity_cones.jpg on your hard drive is accurately coded in relationship the .htm document that you’re building.
Now that the #photo ID has been established, let’s code the cascading elements that will appear within the ID. Enter the new code that you see in Listing C.
Lisitng C
<html>
<head>
<title>CSS Image Map</title>
<style type="text/css">
#photo {
width: 300px;
height: 224px;
position: relative;
background-image: url(images/fruity_cones.jpg);
background-repeat: no-repeat;
}
#photo ul {
margin: 0;
padding: 0;
list-style: none;
}
</style>
</head>
<body>
<div id="photo"> <ul>
<li class="apple"><a href="http://www.bestapples.com" title="Washington Apples">Washington Apples</a></li>
<li class="orange"><a href="http://www.floridaorange.com" title="Florida Oranges">Florida Oranges</a></li>
</ul>
</div>
</body>
</html>
By defining any <ul> tag that is wrapped within the #photo ID as having a list-style of none, we are stripping the display of any type of bullet points.
Continuing on, let’s code how the <a> tag will appear within the #photo ID. Enter the code in Listing D.
Listing D
<html>
<head>
<title>CSS Image Map</title>
<style type="text/css">
#photo {
width: 300px;
height: 224px;
position: relative;
background-image: url(images/fruity_cones.jpg);
background-repeat: no-repeat;
}
#photo ul {
margin: 0;
padding: 0;
list-style: none;
}
#photo a {
position: absolute;
width: 60px;
height: 60px;
text-indent: -1000em;
}
#photo a:hover {
border: 1px solid #fff;
}
</style>
</head>
<body>
<div id="photo"> <ul>
<li class="apple"><a href="http://www.bestapples.com" title="Washington Apples">Washington Apples</a></li>
<li class="orange"><a href="http://www.floridaorange.com" title="Florida Oranges">Florida Oranges</a></li>
</ul>
</div>
</body>
</html>
When defining the <a> tag style within the #photo ID, it is important that the position: absolute; attribute is present, because it tells the browser to constrain them to the top-left corner of the photo. Otherwise, the hotspots in the final image map would be off by however many pixels the browser is going to use to float the background image.
The width and height define the size of the clickable hotspots on the image map, while the vital attribute text-indent: -1000em; tells the browser to display the hotlinked copy within the <li> tags way, way, to the left of the browser window so that they will never be displayed over the background image.
We’ve also defined an a:hover class within the #photo ID, so that when the user’s mouse cursor hovers over a hotspot on the image map, a white box will appear.
The last bit of coding is the trickiest. Go to your image editor, where the image you downloaded in Figure A should still be open. Measure, in pixels, how far from the top and the left edges of the image you should place the hotspots for your links. In this example, we’re going to link to two external Websites. One will be linked by clicking on the apple, the other by clicking on the orange.
Therefore, we need to define two new classes of the <a> tag, which will be wrapped in the <div id=”photo”> tag. We’ll call them apple and orange. These classes will also dictate the location of the links on the background image. Add the new code that you see in Listing E.
Listing E
<html>
<head>
<title>CSS Image Map</title>
<style type="text/css">
#photo {
width: 300px;
height: 224px;
position: relative;
background-image: url(images/fruity_cones.jpg);
background-repeat: no-repeat;
}
#photo ul {
margin: 0;
padding: 0;
list-style: none;
}
#photo a {
position: absolute;
width: 60px;
height: 60px;
text-indent: -1000em;
}
#photo a:hover {
border: 1px solid #fff;
}
#photo .apple a {
top: 29px;
left: 95px; }
#photo .orange a {
top: 131px;
left: 152px; }
</style>
</head>
<body>
<div id="photo"> <ul>
<li class="apple"><a href="http://www.bestapples.com" title="Washington Apples">Washington Apples</a></li>
<li class="orange"><a href="http://www.floridaorange.com" title="Florida Oranges">Florida Oranges</a></li>
</ul>
</div>
</body>
</html>
And with that, our CSS image map is complete. Save the document and preview it in your browser. (Figure B) You’ll see that the title attributes in the <a> tags of the document give us a nice label, ala the <alt> tag.
Figure B
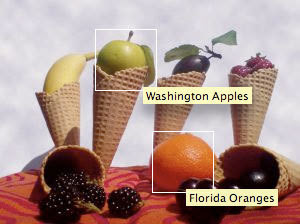
The final CSS Image map, with mouseover effects
While Image maps are still considered valid HTML, you can use this CSS method to finally separate content from presentation. It also has the advantage of using less code for more complex image maps, and is good practice for knowing when to declare IDs rather than Classes in your CSS code.


.jpg)

0 comments:
Post a Comment